HTML5テクニカルノート
Angular 4入門 09: HTTPサービスでデータを追加・削除する
- ID: FN1707006
- Technique: HTML5 / JavaScript
- Package: Angular 4.2
「Angular 4入門 08: HTTPサービスでデータを取得・保存する」(以下「Angular 4入門 08」)でつくったサンプル「Angular 4 Example - Tour of Heroines: Part 8」は、データをHTTPサービスでリモートから読み込んで表示し、書き替えて保存しました。さらに、新たなデータを加えたり、すでにあるデータも削除できるようにします。
Angular Version 5については「Angular 5入門 09: HTTPサービスでリモートのデータを加えたり除いたりする」をお読みください。
01 HTTPサービスでデータを新たに加える
「Angular 4入門 08」で書いたコードに手を加えてゆきます。新たなデータは、リスト表示のモジュール(heroines.component)から加えることにしましょう。まず、テンプレートには、つぎのようにタイトル(<h2>要素)の下に要素(<div>)を書き加えます。中に含めるのはデータを打ち込むテキスト入力フィールド(<input>要素)と「追加」のボタン(<button>要素)です。フィールドには#(ハッシュ)で「テンプレート参照変数」(heroineName)を与えました(「Angular 2のローカル変数とexportAs」の「ローカル変数と#シンタックス」参照)。ボタンのクリック(clickイベント)で呼び出すコールバックは、このあとコンポーネントに定めるメソッド(add())です。引数には、テキスト入力フィールドの変数から参照したテキストの値(valueプロパティ)を渡します。そのうえで、テキストは空にしました。
heroines.component.html<h2>ヒロインたち</h2> <div> <label>ヒロイン名:</label><input #heroineName /> <button (click)="add(heroineName.value); heroineName.value=''"> 追加 </button> </div>
つぎに、リスト表示のモジュール(heroines.component)に定めるメソッド(add())は、つぎのように引数(name)に受け取ったテキストから要らない余白をString.trim()メソッドで取り除き、値のあることを確かめたうえで、リモートのデータを扱うサービス(heroineServiceプロパティ)にこのあと備えるメソッド(create())に渡します。そして、コールバックが受け取ったオブジェクト(heroine)は、データ(heroinesプロパティ)の配列に加えています。
heroines.component.tsexport class HeroinesComponent implements OnInit { add(name: string): void { name = name.trim(); if (!name) {return;} this.heroineService.create(name) .then((heroine: Heroine) => { this.heroines.push(heroine); this.selectedHeroine = null; }); } }
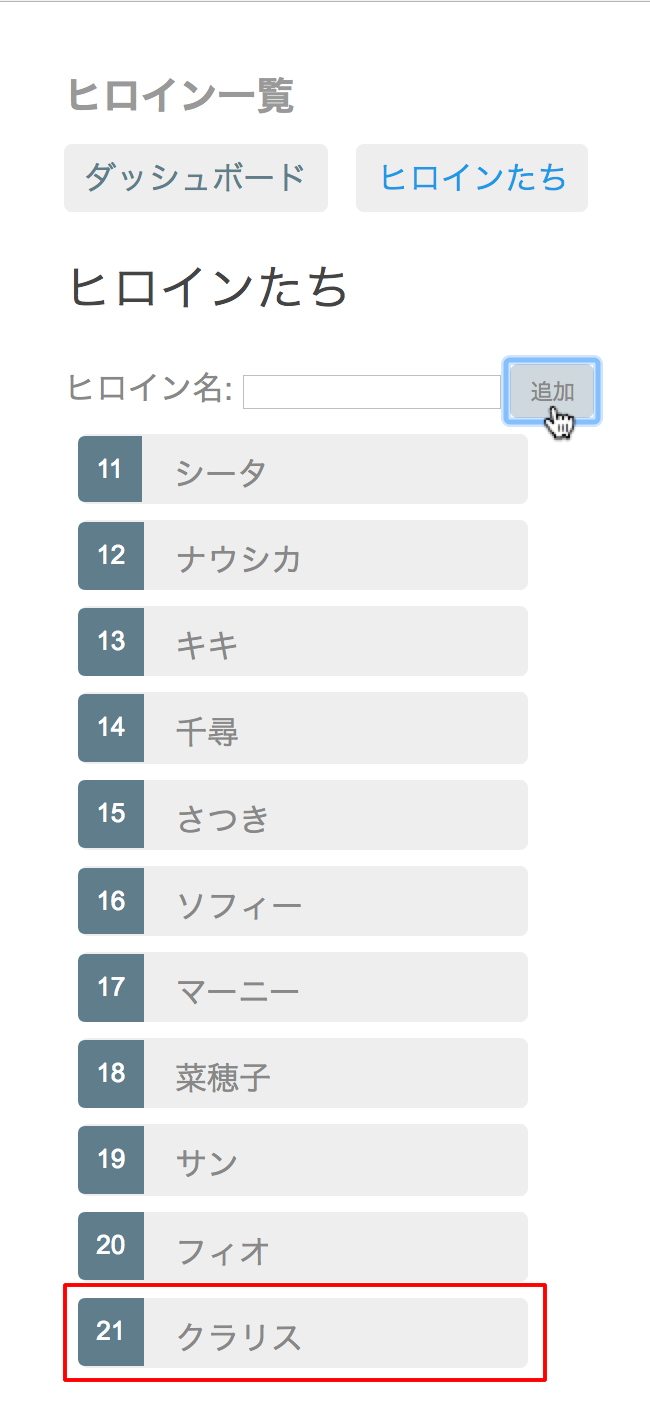
データを扱うサービスのモジュール(heroine.service)に備えるのは、データを新たにつくるつぎのメソッド(create())です。受け取った値(name)をJSON文字列にしてHttp.post()メソッドにリクエストとして渡し、Observableオブジェクトのデータで返します。これで、テキスト入力フィールドに打ち込んだテキストが、新たなデータとして加えられるようになりました(図001)。手を加えたモジュールとテンプレートは、以下のコード001のとおりです。
heroine.service.tsexport class HeroineService { create(name: string): Promise<Heroine> { return this.http .post(this.heroinesUrl, JSON.stringify({name: name}), {headers: this.headers}) .toPromise() .then((response: Response) => response.json().data) .catch(this.handleError); } }
図001■テキスト入力フィールドから新たなデータが加えられる

コード001■HTTPサービスで新たなデータを加える
heroines.component.html
<h2>ヒロインたち</h2>
<div>
	<label>ヒロイン名:</label> <input #heroineName />
	<button (click)="add(heroineName.value); heroineName.value=''">
		追加
	</button>
</div>
<ul class="heroines">
	<li *ngFor="let heroine of heroines"
			[class.selected]="heroine === selectedHeroine"
			(click)="onSelect(heroine)">
		<span class="badge">{{heroine.id}}</span>
		<span>{{heroine.name}}</span>
	</li>
</ul>
<div *ngIf="selectedHeroine">
	<h2>
		ヒロイン「{{selectedHeroine.name}}」
	</h2>
	<button (click)="gotoDetail()">詳細を見る</button>
</div>
import {Component, OnInit} from '@angular/core';
import {Router} from '@angular/router';
import {Heroine} from './heroine';
import {HeroineService} from './heroine.service';
@Component({
	moduleId: module.id,
	selector: 'my-heroines',
	templateUrl: 'heroines.component.html',
	styleUrls: ['heroines.component.css']
})
export class HeroinesComponent implements OnInit {
	heroines: Heroine[];
	selectedHeroine: Heroine;
	constructor(
		private router: Router,
		private heroineService: HeroineService
	) {}
	onSelect(heroine: Heroine): void {
		this.selectedHeroine = heroine;
	}
	getHeroines(): void {
		this.heroineService.getHeroines().then((heroines: Heroine[]) => this.heroines = heroines);
	}
	add(name: string): void {
		name = name.trim();
		if (!name) {return;}
		this.heroineService.create(name)
			.then((heroine: Heroine) => {
				this.heroines.push(heroine);
				this.selectedHeroine = null;
		});
	}
	ngOnInit(): void {
		this.getHeroines();
	}
	gotoDetail(): void {
		this.router.navigate(['/detail', this.selectedHeroine.id]);
	}
}
import {Injectable} from '@angular/core';
import {Headers, Http, Response} from '@angular/http';
import 'rxjs/add/operator/toPromise';
import {Heroine} from './heroine';
@Injectable()
export class HeroineService {
	private headers: Headers = new Headers({'Content-Type': 'application/json'});
	private heroinesUrl: string = 'api/heroines';
	constructor(private http: Http) {}
	getHeroines(): Promise<Heroine[]> {
		return this.http.get(this.heroinesUrl)
			.toPromise()
			.then((response: Response) => response.json().data as Heroine[])
			.catch(this.handleError);
	}
	getHeroine(id: number): Promise<Heroine> {
		const url: string = `${this.heroinesUrl}/${id}`;
		return this.http.get(url)
			.toPromise()
			.then((response: Response) => response.json().data as Heroine)
			.catch(this.handleError);
	}
	create(name: string): Promise<Heroine> {
		return this.http
			.post(this.heroinesUrl, JSON.stringify({name: name}), {headers: this.headers})
			.toPromise()
			.then((response: Response) => response.json().data)
			.catch(this.handleError);
	}
	update(heroine: Heroine): Promise<Heroine> {
		const url: string = `${this.heroinesUrl}/${heroine.id}`;
		return this.http
			.put(url, JSON.stringify(heroine), {headers: this.headers})
			.toPromise()
			.then(() => heroine)
			.catch(this.handleError);
	}
	private handleError(error: any): Promise<any> {
		console.error('An error occured', error);
		return Promise.reject(error.message || error);
	}
}
02 HTTPサービスでデータを除く
すでにリモートに加えられているデータを、HTTPサービスで取り除けるようにしましょう。リスト表示のモジュール(heroines.component)で、項目ごとに削除のボタンをつけることにします。テンプレート(heroines.component.html)のリスト項目(<li>要素)に、つぎのようにボタン(<button>要素)を加えます。クリック(clickイベント)したらコンポーネントのメソッド(delete())を呼び出すのは、これまでと同じつくりです。引数には、削除すべきその項目のデータ(heroine)を渡します。さらに、Event.stopPropagation()メソッドを呼び出して、親の<li>要素にクリックイベントが伝わるのを止めました。
heroines.component.html<li *ngFor="let heroine of heroines" [class.selected]="heroine === selectedHeroine" (click)="onSelect(heroine)"> <button class="delete" (click)="delete(heroine); $event.stopPropagation()">x</button> </li>
リスト表示のモジュール(heroines.component)に定めるメソッド(delete())は、つぎのようにデータを扱うサービス(heroineServiceプロパティ)のメソッド(delete())に取り除くデータのidを渡します。リモートのデータはサービスにより除かれます。けれど、このコンポーネントのデータも改めなければなりません。そこで、削除するデータはArray.filter()メソッドで、プロパティ(heroines)の配列から取り去りました。また、その項目が選択されていた場合(selectedHeroine)は外します。
heroines.component.tsexport class HeroinesComponent implements OnInit { delete(heroine: Heroine): void { this.heroineService .delete(heroine.id) .then(() => { this.heroines = this.heroines.filter((_heroine: Heroine) => _heroine !== heroine); if (this.selectedHeroine === heroine) { this.selectedHeroine = null; } }); } }
データを扱うサービスのモジュール(heroine.service)に加える削除のメソッド(delete())は、受け取ったidから定めたURLをつぎのようにHttp.delete()メソッドに渡します。これで、HTTPサービスによりリモートのデータが除かれるのです。
heroine.service.tsexport class HeroineService { delete(id: number): Promise<void> { const url = `${this.heroinesUrl}/${id}`; return this.http.delete(url, {headers: this.headers}) .toPromise() .then(() => null) .catch(this.handleError); } }
リスト表示のモジュール(heroines.component)に加えた削除ボタン(<button>要素)のスタイルも整えましょう。前掲テンプレートでボタンにはclass属性(delete)を与えました。このクラスに、CSSファイル(heroines.component.css)でつぎの定めを加えます。
heroines.component.cssbutton.delete { float:right; margin-top: 2px; margin-right: .8em; background-color: gray !important; color:white; }
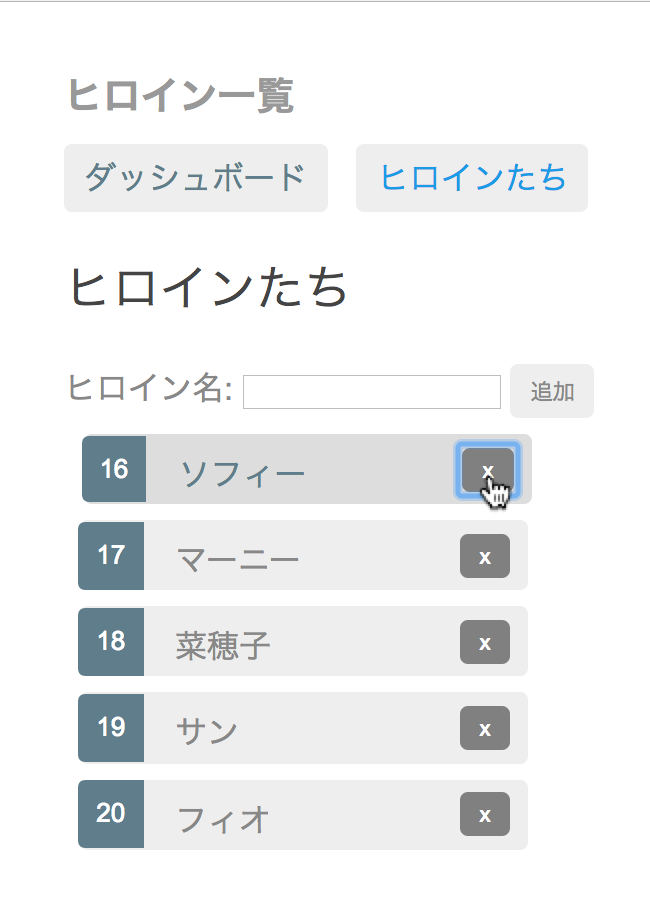
これで新たなデータを加えるだけでなく、すでにある項目も削除ボタンで除くことができるようになりました。手直ししたモジュールとテンプレートおよびCSSの定めは、つぎのコード002のとおりです。併せて、Plunkerに「Angular 4 Example - Tour of Heroines: Part 9」として、サンプルコードをアップロードしました。実際の動きや、すべてのモジュールおよびテンプレート、CSSのコードは、こちらでお確かめください。
図002■削除のボタンでデータが除かれる

コード002■HTTPサービスによりリモートのデータを追加・削除する
heroines.component.html
<h2>ヒロインたち</h2>
<div>
<label>ヒロイン名:</label> <input #heroineName />
<button (click)="add(heroineName.value); heroineName.value=''">
追加
</button>
</div>
<ul class="heroines">
<li *ngFor="let heroine of heroines"
[class.selected]="heroine === selectedHeroine"
(click)="onSelect(heroine)">
<span class="badge">{{heroine.id}}</span>
<span>{{heroine.name}}</span>
<button class="delete"
(click)="delete(heroine); $event.stopPropagation()">x</button>
</li>
</ul>
<div *ngIf="selectedHeroine">
<h2>
ヒロイン「{{selectedHeroine.name}}」
</h2>
<button (click)="gotoDetail()">詳細を見る</button>
</div>
import {Component, OnInit} from '@angular/core';
import {Router} from '@angular/router';
import {Heroine} from './heroine';
import {HeroineService} from './heroine.service';
@Component({
moduleId: module.id,
selector: 'my-heroines',
templateUrl: 'heroines.component.html',
styleUrls: ['heroines.component.css']
})
export class HeroinesComponent implements OnInit {
heroines: Heroine[];
selectedHeroine: Heroine;
constructor(
private router: Router,
private heroineService: HeroineService
) {}
onSelect(heroine: Heroine): void {
this.selectedHeroine = heroine;
}
getHeroines(): void {
this.heroineService.getHeroines().then((heroines: Heroine[]) => this.heroines = heroines);
}
add(name: string): void {
name = name.trim();
if (!name) {return;}
this.heroineService.create(name)
.then((heroine: Heroine) => {
this.heroines.push(heroine);
this.selectedHeroine = null;
});
}
delete(heroine: Heroine): void {
this.heroineService
.delete(heroine.id)
.then(() => {
this.heroines = this.heroines.filter((_heroine: Heroine) => _heroine !== heroine);
if (this.selectedHeroine === heroine) {
this.selectedHeroine = null;
}
});
}
ngOnInit(): void {
this.getHeroines();
}
gotoDetail(): void {
this.router.navigate(['/detail', this.selectedHeroine.id]);
}
}
.selected {
background-color: #CFD8DC !important;
color: white;
}
.heroines {
margin: 0 0 2em 0;
list-style-type: none;
padding: 0;
width: 15em;
}
.heroines li {
cursor: pointer;
position: relative;
left: 0;
background-color: #EEE;
margin: 0.5em;
padding: 0.3em 0;
height: 1.6em;
border-radius: 4px;
}
.heroines li.selected:hover {
background-color: #BBD8DC !important;
color: white;
}
.heroines li:hover {
color: #607D8B;
background-color: #DDD;
left: 0.1em;
}
.heroines .text {
position: relative;
top: -3px;
}
.heroines .badge {
display: inline-block;
font-size: small;
color: white;
padding: 0.8em 0.7em 0 0.7em;
background-color: #607D8B;
line-height: 1em;
position: relative;
left: -1px;
top: -4px;
height: 1.8em;
margin-right: .8em;
border-radius: 4px 0 0 4px;
}
button.delete {
	float:right;
	margin-top: 2px;
	margin-right: .8em;
	background-color: gray !important;
	color:white;
}
import {Injectable} from '@angular/core';
import {Headers, Http, Response} from '@angular/http';
import 'rxjs/add/operator/toPromise';
import {Heroine} from './heroine';
@Injectable()
export class HeroineService {
	private headers: Headers = new Headers({'Content-Type': 'application/json'});
	private heroinesUrl: string = 'api/heroines';
	constructor(private http: Http) {}
	getHeroines(): Promise<Heroine[]> {
		return this.http.get(this.heroinesUrl)
			.toPromise()
			.then((response: Response) => response.json().data as Heroine[])
			.catch(this.handleError);
	}
	getHeroine(id: number): Promise<Heroine> {
		const url: string = `${this.heroinesUrl}/${id}`;
		return this.http.get(url)
			.toPromise()
			.then((response: Response) => response.json().data as Heroine)
			.catch(this.handleError);
	}
	create(name: string): Promise<Heroine> {
		return this.http
			.post(this.heroinesUrl, JSON.stringify({name: name}), {headers: this.headers})
			.toPromise()
			.then((response: Response) => response.json().data)
			.catch(this.handleError);
	}
	delete(id: number): Promise<void> {
		const url = `${this.heroinesUrl}/${id}`;
		return this.http.delete(url, {headers: this.headers})
			.toPromise()
			.then(() => null)
			.catch(this.handleError);
	}
	update(heroine: Heroine): Promise<Heroine> {
		const url: string = `${this.heroinesUrl}/${heroine.id}`;
		return this.http
			.put(url, JSON.stringify(heroine), {headers: this.headers})
			.toPromise()
			.then(() => heroine)
			.catch(this.handleError);
	}
	private handleError(error: any): Promise<any> {
		console.error('An error occured', error);
		return Promise.reject(error.message || error);
	}
}
- Angular 4: とにかくAngular 4でコードを書いて動かす
- Angular 4入門 01: 編集ページをつくる
- Angular 4入門 02: リストを加える
- Angular 4入門 03: コンポーネントを分ける
- Angular 4入門 04: サービスをつくる
- Angular 4入門 05: リスト表示のコンポーネントを分ける
- Angular 4入門 06: Routerを使う
- Angular 4入門 07: Routerで画面を遷移させる
- Angular 4入門 08: HTTPサービスでデータを取得・保存する
作成者: 野中文雄
作成日: 2017年7月12日
Copyright © 2001-2017 Fumio Nonaka. All rights reserved.