HTML5テクニカルノート
Angular 5入門 04: 詳細情報のコンポーネントを分ける
- ID: FN1801003
- Technique: HTML5 / JavaScript
- Package: Angular 5.2.1
「Angular 5入門 02: 編集ページをつくる」はアプリケーションにメインのコンポーネントを定めて、1件の情報の編集ができるようにしました。さらに、「Angular 5入門 03: データのリストを表示する」では、データを複数にしてリスト表示も加え、それらの情報がそれぞれ書き替えられるようにしました。本稿は、アプリケーションの動きはそのままに、詳細情報の編集部分を別のコンポーネントに切り分けます。アプリケーションに機能を加えたり、変更するときに、コンポーネント分けしてある方が扱いやすいからです。また、他のアプリケーションに使い回すこともできます。
Angular Version 6については「Angular 6入門 04: 詳細情報のコンポーネントを分ける」をお読みください。
01 詳細情報のコンポーネントをつくる
まず、詳細情報のコンポーネントをAngular CLIでつくります。コマンドラインツールでアプリケーションのディレクトリ(angular-tour-of-heroines)に移ったら、以下のようにng generate componentコマンドを打ち込んでください(「Angular 5入門 02」01「新たなコンポーネントをつくる」参照)。appフォルダに新しいコンポーネントのディレクトリ(heroine-detail)が加えられ、つぎの3つのファイルが納められます(CSSファイルの中身は空です)。
ngコマンドng generate component heroine-detail
アプリケーションに組み込まれているリスト表示コンポーネント(heroines.component)のテンプレートから、詳細情報の要素をつぎのように抜き取ります。替わりに、タグで加えるのは、詳細情報のコンポーネント(heroine-detail.component)にデコレータ関数Component()で定められたセレクタ(app-heroine-detail)です。
src/app/heroines/heroines.component.htmlsrc/app/heroine-detail/heroine-detail.component.ts<!-- <div *ngIf="selectedHeroine"> <h2>{{selectedHeroine.name}}の情報</h2> <div><span>番号: </span>{{selectedHeroine.id}}</div> <div> <label>名前: <input [(ngModel)]="selectedHeroine.name" placeholder="名前"> </label> </div> </div> --> <app-heroine-detail [heroine]="selectedHeroine"></app-heroine-detail>@Component({ selector: 'app-heroine-detail', }) export class HeroineDetailComponent implements OnInit { }
詳細情報のコンポーネント(heroine-detail.component)のテンプレートには、リスト表示コンポーネント(heroines.component)のテンプレートから抜き出した詳細情報の要素をつぎのコード001のように加えます。ただし、詳細情報のオブジェクトの名前は、selectedHeroineからheroineに書き替えてください。以下に、書き替えたリスト表示コンポーネントのテンプレートも掲げます。
コード001■詳細情報とリスト表示のコンポーネントのテンプレート
src/app/heroine-detail/heroine-detail.component.html
<div *ngIf="heroine">
	<h2>{{heroine.name}}の情報</h2>
	<div><span>番号: </span>{{heroine.id}}</div>
	<div>
		<label>名前:
			<input [(ngModel)]="heroine.name" placeholder="名前"/>
		</label>
	</div>
 </div>
<ul class="heroines">
	<li *ngFor="let heroine of heroines"
		[class.selected]="heroine === selectedHeroine"
		(click)="onSelect(heroine)">
		<span class="badge">{{heroine.id}}</span> {{heroine.name}}
	</li>
</ul>
<app-heroine-detail [heroine]="selectedHeroine"></app-heroine-detail>
02 親コンポーネントのプロパティを子にバインディングする
リスト表示のコンポーネント(heroines.component)は、テンプレートで子の詳細情報コンポーネント(heroine-detail.component)のセレクタ(app-heroine-detail)にプロパティ(selectedHeroine)をバインディングしました。
src/app/heroines/heroines.component.htmlsrc/app/heroines/heroines.component.ts<app-heroine-detail [heroine]="selectedHeroine"></app-heroine-detail>export class HeroinesComponent implements OnInit { selectedHeroine: Heroine; onSelect(heroine: Heroine): void { this.selectedHeroine = heroine; } }
けれど、親コンポーネントから子に対してであっても、一方的に値は渡せません。子の詳細情報コンポーネント(heroine-detail.component)のクラス(HeroineDetailComponent)の側で、値を受け取るプロパティ(heroine)につぎのようにデコレータ関数Input()が添えられていなければならないのです(「Binding to an @Input property」および「Angular 2 @Inputのアレコレ」参照)。なお、Input()関数とプロパティを型づけるクラス(Heroine)は、importしておきます。
src/app/heroine-detail/heroine-detail.component.ts// import {Component, OnInit} from '@angular/core'; import {Component, OnInit, Input} from '@angular/core'; import {Heroine} from '../heroine'; export class HeroineDetailComponent implements OnInit { @Input() heroine: Heroine; }
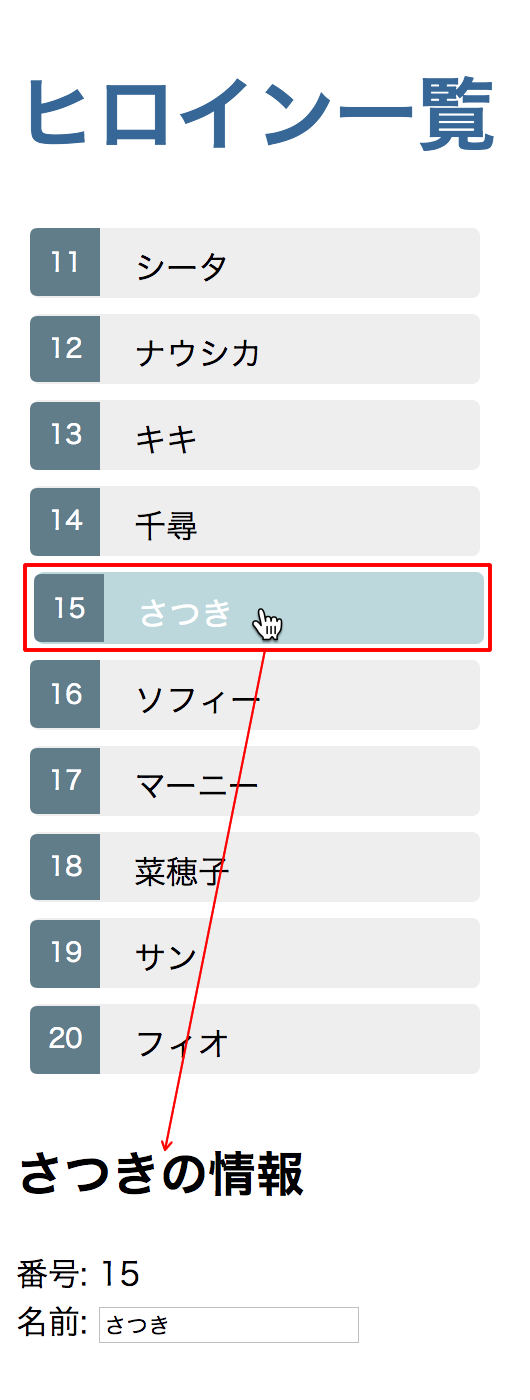
これで詳細情報コンポーネント(heroine-detail.component)のプロパティ(heroine)が親コンポーネント(heroines.component)のプロパティにバインディングされます。これで前回「Angular 5入門 03」のコード(「Angular 5 Example - Tour of Heroines 03」)と同じように、リストから選んだ項目の詳細情報が示されます(図001)。
図001■リストから選んだ項目の詳細情報が示される
でき上がった詳細情報を示すコンポーネント(heroine-detail.component)のTypeScriptは、つぎのコード001に全体を掲げました。また、前述01「詳細情報のコンポーネントをつくる」のngコマンドによりコンポーネントのクラス(HeroineDetailComponent)が加えられたアプリケーションモジュール(app.module.ts)のTypeScriptコードも、併せて示します。サンプルコードは「Angular 5 Example - Tour of Heroines 04」でご覧ください。
コード002■詳細情報を示すコンポーネントとアプリケーションのTypeScriptコード
src/app/heroine-detail/heroine-detail.component.ts
import {Component, OnInit, Input} from '@angular/core';
import {Heroine} from '../heroine';
@Component({
	selector: 'app-heroine-detail',
	templateUrl: './heroine-detail.component.html',
	styleUrls: ['./heroine-detail.component.css']
})
export class HeroineDetailComponent implements OnInit {
	@Input() heroine: Heroine;
	constructor() {}
	ngOnInit() {
	}
}
import {BrowserModule} from '@angular/platform-browser';
import {NgModule} from '@angular/core';
import {FormsModule} from '@angular/forms';
import {AppComponent} from './app.component';
import {HeroinesComponent} from './heroines/heroines.component';
import {HeroineDetailComponent} from './heroine-detail/heroine-detail.component';
@NgModule({
	declarations: [
		AppComponent,
		HeroinesComponent,
		HeroineDetailComponent
	],
	imports: [
		BrowserModule,
		FormsModule
	],
	providers: [],
	bootstrap: [AppComponent]
})
export class AppModule {}
- Angular 5: Angular CLIで手早くアプリケーションをつくる
- Angular 5入門 01: アプリケーションの枠組みをつくる
- Angular 5入門 02: 編集ページをつくる
- Angular 5入門 03: データのリストを表示する
- Angular 5入門 05: データをサービスにより提供する
- Angular 5入門 06: ルーティングで画面を切り替える
- Angular 5入門 07: ルーティングで個別情報を示す
- Angular 5入門 08: HTTPサービスでリモートのデータを取り出して書き替える
- Angular 5入門 09: HTTPサービスでリモートのデータを加えたり除いたりする
- Angular 5入門 10: HTTPサービスでリモートのデータを検索する
作成者: 野中文雄
作成日: 2018年1月20日
Copyright © 2001-2018 Fumio Nonaka. All rights reserved.