HTML5テクニカルノート
Angular 6入門 02: 編集ページをつくる
- ID: FN1805006
- Technique: HTML5 / JavaScript
- Package: Angular 6.0.0
「Angular 6入門」シリーズはAngular公式サイトの「Tutorial」をもとに、説明の仕方や進め方を手直ししたものです。本稿は「Angular 6入門 01: アプリケーションの枠組みをつくる」で書いたコードに新たなコンポーネントを加えて、インタラクティブにアプリケーションのデータが編集できるようします。
01 新たなコンポーネントをつくる
新たなコンポーネントは、Angular CLIでつくります。アプリケーションのプロジェクトが入っているディレクトリ(angular-tour-of-heroines)に移動し、以下のようにng generate componentコマンドを打ち込んでください。appフォルダに新しいコンポーネントのディレクトリ(heroines)が加えられ、つぎの3つのファイルが納められます。なお、CSSファイルは中身が空です。
ng generate component heroines
新しいコンポーネント(heroines.component)のTypeScriptファイルは以下のとおりです。Component()関数に加えて、OnInitインタフェースがimportされています。@でデコレータ関数として用いられたComponent()がクラス(HeroinesComponent)に与えるのはつぎの3つのメタデータです(「TypeScript入門 12: デコレータ(Decorator)を使う」参照)。implementsキーワードでOnInitインタフェースを実装すると、クラスにngOnInit()メソッドを備えなければなりません(「TypeScript: インタフェース」参照)。今はまだメソッド本体の処理は空です。ngOnInit()メソッドは、コンポーネントがつくられたすぐあとに呼び出されます。なお、constructor()はクラスのインスタンスをつくるメソッドです(「TypeScript: クラス」参照)。
selector: コンポーネントのタグtemplateUrl: HTMLテンプレートのパスstyleUrls: CSSファイルのパスの配列
src/app/heroines/heroines.component.tsimport {Component, OnInit} from '@angular/core'; @Component({ selector: 'app-heroines', templateUrl: './heroines.component.html', styleUrls: ['./heroines.component.css'] }) export class HeroinesComponent implements OnInit { constructor() {} ngOnInit(): void { } }
02 新たなコンポーネントを加える
コンポーネント(heroines.component)のクラス(HeroinesComponent)に、つぎのようにプロパティ(heroine)とその値を与えます。
src/app/heroines/heroines.component.tsexport class HeroinesComponent implements OnInit { heroine = 'シータ'; }
そのうえで、テンプレートの要素(<p>)に加えるテキストはつぎのように書き替えて、二重波かっこ{{}}でクラスのプロパティ(heroine)とバインディングしましょう。
src/app/heroines/heroines.component.html<p> <!--heroines works!--> {{heroine}} </p>
そして、新たなコンポーネント(heroines.component)を親コンポーネント(app.component)のテンプレートに差し込むのです(コード001)。加える子コンポーネントのタグ(app-heroines)は、TypeScriptファイルのデコレータ関数Component()に渡す引数オブジェクトにプロパティselectorで定めてありました。
src/app/heroines/heroines.component.ts@Component({ selector: 'app-heroines', })
コード001■親コンポーネントのテンプレートに差し込まれた新たなコンポーネント
src/app/app.component.html
<h1>{{title}}</h1>
<app-heroines></app-heroines>
Angular CLIのng serveコマンドが働いていれば、新しいコンポーネントがページに差し込まれ、クラスに定めたプロパティのテキストがページに示されます(図001)。
図001■新たなコンポーネントが差し込まれたページ

ここでひとつ補っておくことがあります。コンポーネントはアプリケーションのモジュール(app.module)に加えておかなければ使えないのです。アプリケーションモジュールのTypeScriptファイルを確かめると、つぎのように新たなコンポーネントのクラス(HeroinesComponent)がimportされ、デコレータ関数NgModule()の引数オブジェクトではdeclarationsプロパティの配列に加えられています。Angular CLIのng generate componentコマンドは、アプリケーションモジュールのコードも書き替えてくれたのです。
src/app/app.module.tsimport {HeroinesComponent} from './heroines/heroines.component'; @NgModule({ declarations: [ HeroinesComponent ], }) export class AppModule {}
03 データをクラスで定める
データはただの文字列ひとつではなく、複数のプロパティがもてるようにオブジェクトにしましょう。つぎのコード002がそのためのクラス(Heroine)です。プロパティをふたつ(idとname)定めました。
コード002■データを定めるクラス
src/app/Heroine.ts
export class Heroine {
	id: number;
	name: string;
}
子コンポーネント(heroines.component)のプロパティ(heroine)は、データのクラス(Heroine)に合わせて値をつぎの抜き書きのように書き替えます。識別子のあとにコロン(:)を添えると、型づけができます(「TypeScript: 基本型」参照)。もっとも、前掲コード002のクラス(Heroine)を型として与えたものの、定めた値はただのオブジェクトです。TypeScriptで型が合うということは、クラスの継承やインタフェースの実装がなくても、プロパティやメソッドを同じ型で備えるかどうかにより決まるのです(「TypeScript: 型の互換性」)。
src/app/heroines/heroines.component.tsimport {Heroine} from '../heroine'; export class HeroinesComponent implements OnInit { // heroine = 'シータ'; heroine: Heroine = { id: 1, name: 'シータ' }; }
子コンポーネント(heroines.component)のテンプレートもつぎのように書き替えて、バインディング{{}}の参照はオブジェクト(heroine)からプロパティ(idとname)を取り出すかたちにします。
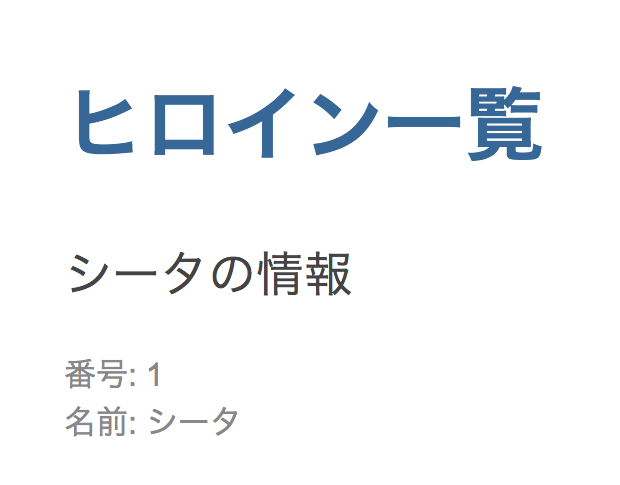
src/app/heroines/heroines.component.html<!--<p> {{heroine}} </p>--> <h2>{{heroine.name}}の情報</h2> <div><span>番号: </span>{{heroine.id}}</div> <div><span>名前: </span>{{heroine.name}}</div>
これで、データに定めたふたつのプロパティ値が、アプリケーションのページの要素に差し込まれます(図002)。
図002■データのふたつのプロパティ値が要素のテキストに差し込まれた
04 テキスト入力フィールドとデータを双方向にバインディングする
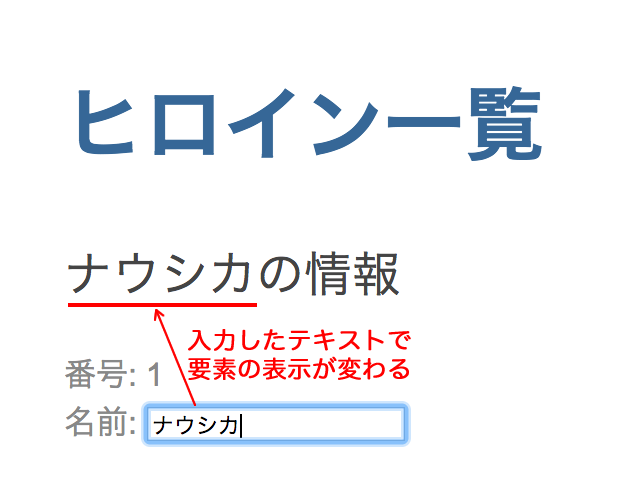
子コンポーネント(heroines.component)のバインディングした要素のひとつを、テキスト入力フィールド(<input>)に変えます。入力したテキストでデータが書き替えられるように、双方向のバインディングにするのです。テンプレートはつぎのように改めます。フォームの要素にngModelディレクティブを[()]構文(banana-box syntaxと呼びます)で定めると、プロパティと要素は双方向にバインディングされます。なお、ディレクティブを角かっこ[]だけの構文でくくると一方向になります(フィールドのテキストを書き替えてもプロパティ値は変わりません)。
src/app/heroines/heroines.component.html<div> <!--<span>名前: </span>{{heroine.name}}--> <label>名前: <input [(ngModel)]="heroine.name" placeholder="名前"> </label> </div>
もっとも、これだけでアプリケーションを見ると、ブラウザのコンソールにはつぎのようなエラーが示されます。ngModelディレクティブがAngularのデフォルトのモジュールに含まれていないため、フォームの要素(<input>)で使えないというのです。
Uncaught Error: Template parse errors:
Can't bind to 'ngModel' since it isn't a known property of 'input'.
<label>名前:
<input [ERROR ->][(ngModel)]="heroine.name" placeholder="名前">
アプリケーションのモジュール(app.module)加えなければならないのがFormsModuleクラスです。つぎのようにimportしたうえで、NgModule()デコレータ関数に渡す引数オブジェクトのimportsプロパティに配列エレメントとして加えます。このようにデコレータ関数に与える、アプリケーションが必要とするファイルやライブラリの情報はメタデータと呼ばれます。
src/app/app.module.tsimport {FormsModule} from '@angular/forms'; @NgModule({ imports: [ FormsModule ], })
これで、フィールドに入力したテキストがプロパティの値を書き替え、同じプロパティにバインディングされた要素の表示も変わります(図003)。
図003■入力したテキストにプロパティの値が書き替わる
子コンポーネント(heroines.component)のTypeScriptとテンプレートおよびアプリケーションモジュール()のTypeScriptコードをつぎのコード003にまとめました。併せて、StackBlitz に「angular-6-example-tour-of-heroines-02」としてアップロードしましたので、ファイルごとのコードの中身はこちらでお確かめください(index.htmlの設定はAngular CLIとは異なっています)。
コード003■子コンポーネントとアプリケーションモジュールのコード
src/app/heroines/heroines.component.ts
import {Component, OnInit} from '@angular/core';
import {Heroine} from '../heroine';
@Component({
	selector: 'app-heroines',
	templateUrl: './heroines.component.html',
	styleUrls: ['./heroines.component.css']
})
export class HeroinesComponent implements OnInit {
	heroine: Heroine = {
		id: 1,
		name: 'シータ'
	};
	constructor() {}
	ngOnInit(): void {
	}
}
<h2>{{heroine.name}}の情報</h2>
<div><span>番号: </span>{{heroine.id}}</div>
<div>
	<label>名前:
		<input [(ngModel)]="heroine.name" placeholder="名前">
	</label>
</div>
import {BrowserModule} from '@angular/platform-browser';
import {NgModule} from '@angular/core';
import {FormsModule} from '@angular/forms';
import {AppComponent} from './app.component';
import {HeroinesComponent} from './heroines/heroines.component';
@NgModule({
	declarations: [
		AppComponent,
		HeroinesComponent
	],
	imports: [
		BrowserModule,
		FormsModule
	],
	providers: [],
	bootstrap: [AppComponent]
})
export class AppModule {}
Angular 6入門
- Angular 6: Angular CLIで手早くアプリケーションをつくる
- Angular 6入門 01: アプリケーションの枠組みをつくる
- Angular 6入門 03: データのリストを表示する
- Angular 6入門 04: 詳細情報のコンポーネントを分ける
- Angular 6入門 05: データをサービスにより提供する
- Angular 6入門 06: ルーティングで画面を切り替える
- Angular 6入門 07: ルーティングで個別情報を示す
- Angular 6入門 08: HTTPサービスでリモートのデータを取り出して書き替える
作成者: 野中文雄
作成日: 2018年5月11日
Copyright © 2001-2018 Fumio Nonaka. All rights reserved.