HTML5テクニカルノート
Angular 6入門 07: ルーティングで個別情報を示す
- ID: FN1805011
- Technique: HTML5 / JavaScript
- Package: Angular 6.0.0
「Angular 6入門 06: ルーティングで画面を切り替える」は、アプリケーションにルーティングのモジュールを新たに加えました。ページに差し込むコンポーネントをURLとともに改めて、ページが遷移するように表現したのです。本稿では、ルーティングのコンポーネントをさらに切り分けます。ダッシュボードやリスト表示のコンポーネントで選択した個別データをルーティングして、詳細情報の表示に遷移させます。
01 詳細情報のルーティングを加える
これまで、詳細情報のコンポーネント(heroine-detail.component.html)はリスト表示のコンポーネント(heroines.component)のテンプレートに含まれていました(「Angular 6入門 04」コード001「詳細情報とリスト表示のコンポーネントのテンプレート」)。これを分けて、まずはダッシュボードのコンポーネント(dashboard.component)から遷移させましょう。そのために、ルーティングのモジュール(app-routing.module)のTypeScriptコードに、つぎのように詳細情報コンポーネントのクラス(HeroineDetailComponent)へのルーティングを加えます。pathプロパティに与えたパスの文字列にコロン(:)で添えたのは変数(id)です。ダッシュボードから選んだデータの番号(id)が値として入ります。
src/app/app-routing.module.tsimport {HeroineDetailComponent} from './heroine-detail/heroine-detail.component'; const routes: Routes = [ {path: 'detail/:id', component: HeroineDetailComponent}, ]; export class AppRoutingModule {}
ダッシュボードコンポーネント(dashboard.component)のテンプレートの<a>要素には、つぎのようにrouterLinkディレクティブにルーティング先のパスを定めます。二重波かっこ{{}}でバインディングしたプロパティ(id)は、ngForディレクティブによってデータ(heroine)ごとに異なる値でパスに加えられることになるのです(「Interpolation ( {{...}} )」参照)。そして、この値は前述ルーティングモジュール(app-routing.module)に詳細情報コンポーネントのパスとして定めたpathプロパティの変数(id)に納められます。
src/app/dashboard/dashboard.component.html<div class="grid grid-pad"> <a *ngFor="let heroine of heroines" class="col-1-4" routerLink="/detail/{{heroine.id}}"><!-- 追加 --> </div> </a> </div>
ここまでの手直しでアプリケーションを開いてダッシュボードのリンクをクリックすると、ダッシュボードが消えるだけで詳細情報は表れません。URLはたとえばつぎのように詳細情報のパスに変わるでしょう。実は、詳細情報コンポーネントもページに差し込まれています。けれど、選択したデータがコンポーネントに渡されないため、表示されないのです。
http://localhost:4200/detail/11
02 ルーティングしたコンポーネントにデータを表示する
詳細情報コンポーネントは、どのようにしてデータを受け取ればよいでしょうか。ルーティングのURLに、選ばれたデータの番号が加えられることは確かめました。すると、その番号からサービス(heroine.service)に問い合わせて、データを返してもらうことができるはずです。
そのためのメソッド(getHeroine())を、以下のようにサービスのクラス(HeroineService)に加えます。引数に受け取った番号(id)をデータの配列(HEROINES)から探すのが、Array.find()メソッドです。引数のコールバックは配列要素をひとつひとつ引数に受け取り、関数本体の条件がtrueと評価された要素を返します。つまり、メソッドが引数に受け取った番号のデータが戻り値となるのです。また、メソッドは処理が行われた旨のテキストをメッセージサービス(messageService)に加えます。
なお、バックティック(``)で括ったテンプレート文字列には、ドル記号と波かっこ${}で変数を含めることができます。メソッド(getHeroine())の戻り値は、of()オペレータでObservableにしなければなりません(「Angular 6入門 05」03「Observableを使って非同期に処理する」参照)。サービスがObservableオブジェクトを返すことにより、のちにデータがHTTPリクエストで得られるようになっても、サービスを使うクラスは何も変えずに済むのです。
src/app/heroine.service.tsexport class HeroineService { getHeroine(id: number): Observable<Heroine> { this.messageService.add(`HeroineService: 番号${id}のデータを取得`); return of(HEROINES.find(heroine => heroine.id === id)); } }
詳細情報のコンポーネント(heroine-detail.component)のTypeScriptコードには、以下のようにActivatedRouteとLocationクラスおよびサービスのクラス(HeroineService)をimportしましょう。すると、コンストラクタはこれらのインスタンスを受け取りますので、それぞれprivateのプロパティに定めます。そして加えるのは、サービスにデータを番号で問い合わせて受け取るメソッド(getHeroine())です。番号はルーティングされたURLから取り出さなければなりません。そのために、ActivatedRouteオブジェクト(route)のsnapshot.paramMapプロパティにParamMap.get()メソッドで、パスに加えた変数名(id)の文字列を引数として与えます。得られた番号をサービス(heroineService)のメソッド(getHeroine())に渡し、返されたオブジェクトに対してObservable.subscribe()メソッドを呼び出せばデータが得られるのです。なお、ParamMap.get()メソッドの戻り値は文字列のため、+演算子を添えることにより定数(id)には数値を代入しました。
ActivatedRouteクラス ー ルーティングで読み込まれたコンポーネントのルート情報をもつActivatedRoute.snapshotプロパティ ー ルーティングでコンポーネントがつくられたときの静的情報をもつActivatedRouteSnapshotオブジェクトActivatedRouteSnapshot.paramMapプロパティ ー URLのルートパラメータが納められたParamMapオブジェクトParamMap.get()メソッド ー 引数の名前のパラメータがもつ文字列値
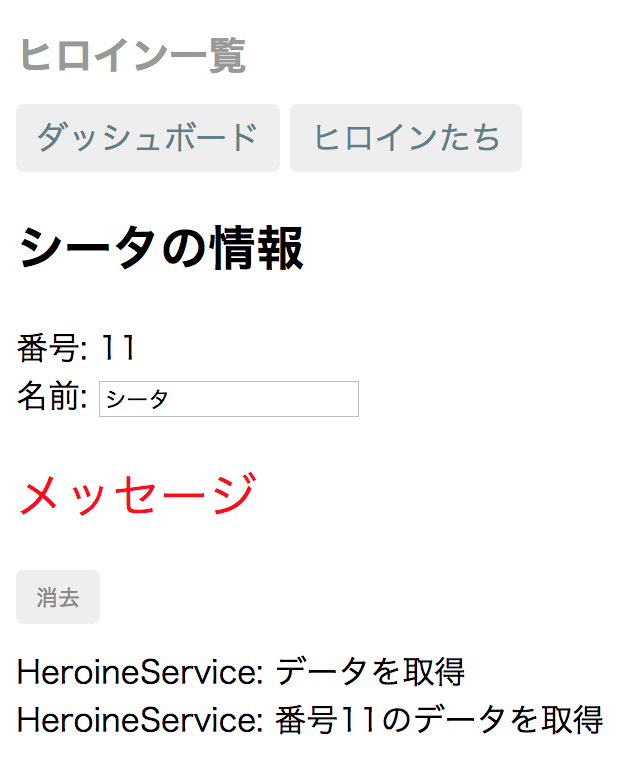
そして、ngOnInit()メソッドからデータ問い合わせのメソッド(getHeroine())を呼び出すことにより、コンポーネントがルーティングでページに差し込まれたとき、そのデータがプロパティに納められます。これで、ダッシュボードから項目が選ばれると、遷移した詳細情報コンポーネントにそのデータが示されるのです(図001)。
src/app/heroine-detail/heroine-detail.component.tsimport {ActivatedRoute} from '@angular/router'; import {Location} from '@angular/common'; import {HeroineService} from '../heroine.service'; export class HeroineDetailComponent implements OnInit { constructor( private route: ActivatedRoute, private heroineService: HeroineService, private location: Location ) {} ngOnInit() { this.getHeroine(); } getHeroine(): void { const id = +this.route.snapshot.paramMap.get('id'); this.heroineService.getHeroine(id) .subscribe(heroine => this.heroine = heroine); } }
図001■ダッシュボードで選んだデータが詳細情報コンポーネントに示される

03 リスト表示から詳細情報に遷移する
リスト表示のコンポーネント(heroines.component)には詳細情報コンポーネント(heroine-detail.component)を子要素として差し込んでいました。これをダッシュボードと同じく、詳細情報にルーティングさせましょう。
src/app/heroines/heroines.component.htmlsrc/app/heroine-detail/heroine-detail.component.ts<ul class="heroines"> </ul> <app-heroine-detail [heroine]="selectedHeroine"></app-heroine-detail>@Component({ selector: 'app-heroine-detail', }) export class HeroineDetailComponent implements OnInit { }
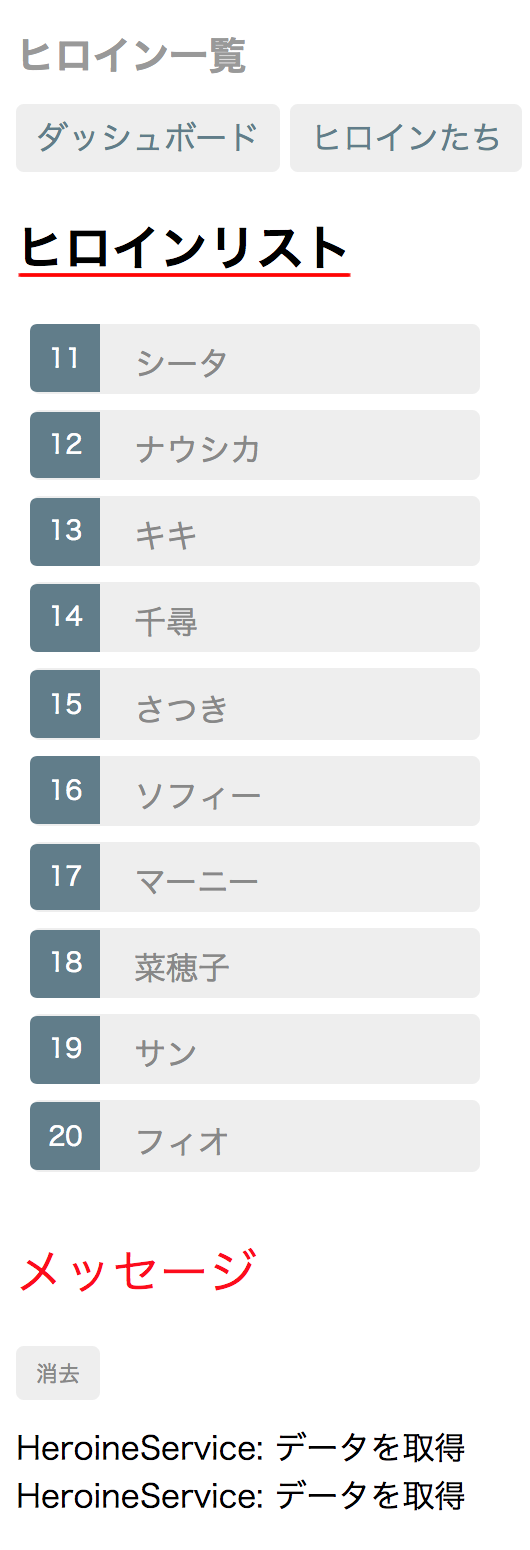
リスト表示のコンポーネント(heroines.component)のテンプレートからは、詳細情報コンポーネントの子要素(app-heroine-detail)は除きます。替わりに<li>要素に加えるのが、つぎのようにrouterLinkディレクティブでルーティング先のパスを与えた<a>要素です。また、コンポーネントの見出し(<h2>要素)も、この機会に加えました(図002)。そして、テンプレートのHTML要素の組み立ても変わったので、コンポーネントのスタイルは以下のコード001のCSSに改めます。併せて、書き直したテンプレートのHTMLコードも掲げておきましょう。
src/app/heroines/heroines.component.html<h2>ヒロインリスト</h2> <ul class="heroines"> <li *ngFor="let heroine of heroines"> <!-- [class.selected]="heroine === selectedHeroine" (click)="onSelect(heroine)"> --> <a routerLink="/detail/{{heroine.id}}"> <span class="badge">{{heroine.id}}</span> {{heroine.name}} </a> </li> </ul> <!-- <app-heroine-detail [heroine]="selectedHeroine"></app-heroine-detail> -->
図002■リスト表示コンポーネントに見出しが加わった

コード001■改められたリスト表示コンポーネントのCSSとテンプレート
src/app/heroines/heroines.component.css
.heroines {
	margin: 0 0 2em 0;
	list-style-type: none;
	padding: 0;
	width: 15em;
}
.heroines li {
	position: relative;
	cursor: pointer;
	background-color: #EEE;
	margin: .5em;
	padding: .3em 0;
	height: 1.6em;
	border-radius: 4px;
}
.heroines li:hover {
	color: #607D8B;
	background-color: #DDD;
	left: .1em;
}
.heroines a {
	color: #888;
	text-decoration: none;
	position: relative;
	display: block;
	width: 250px;
}
.heroines a:hover {
	color:#607D8B;
}
.heroines .badge {
	display: inline-block;
	font-size: small;
	color: white;
	padding: 0.8em 0.7em 0 0.7em;
	background-color: #607D8B;
	line-height: 1em;
	position: relative;
	left: -1px;
	top: -4px;
	height: 1.8em;
	min-width: 16px;
	text-align: right;
	margin-right: .8em;
	border-radius: 4px 0 0 4px;
}
<h3>トップヒロイン</h3>
<div class="grid grid-pad">
	<a *ngFor="let heroine of heroines" class="col-1-4"
		routerLink="/detail/{{heroine.id}}">
			<div class="module heroine">
			<h4>{{heroine.name}}</h4>
		</div>
	</a>
</div>
04 ダッシュボードのリスト表示から詳細表示へのルーティング
ダッシュボードとリスト表示の画面それぞれから、詳細表示へのルーティングはこれででき上がりました。ルーティング(app-routing.module)とサービス(heroine.service)のモジュールのTypeScriptコードおよびリスト表示コンポーネント(heroines.component)のテンプレートは、つぎのコード002にまとめたとおりです。
コード002■でき上がったTypeScriptモジュールとテンプレート
src/app/app-routing.module.ts
import {NgModule} from '@angular/core';
import {RouterModule, Routes} from '@angular/router';
import {DashboardComponent} from './dashboard/dashboard.component';
import {HeroinesComponent} from './heroines/heroines.component';
import {HeroineDetailComponent} from './heroine-detail/heroine-detail.component';
const routes: Routes = [
	{path: '', redirectTo: '/dashboard', pathMatch: 'full'},
	{path: 'dashboard', component: DashboardComponent},
	{path: 'detail/:id', component: HeroineDetailComponent},
	{path: 'heroines', component: HeroinesComponent}
];
@NgModule({
	imports: [RouterModule.forRoot(routes)],
	exports: [RouterModule]
})
export class AppRoutingModule {}
import {Injectable} from '@angular/core';
import {Observable} from 'rxjs/Observable';
import {of} from 'rxjs/observable/of';
import {Heroine} from './heroine';
import {HEROINES} from './mock-heroines';
import {MessageService} from './message.service';
@Injectable()
export class HeroineService {
	constructor(private messageService: MessageService) {}
	getHeroines(): Observable<Heroine[]> {
		this.messageService.add('HeroineService: データを取得');
		return of(HEROINES);
	}
	getHeroine(id: number): Observable<Heroine> {
		this.messageService.add(`HeroineService: 番号${id}のデータを取得`);
		return of(HEROINES.find(heroine => heroine.id === id));
	}
}
<h2>ヒロインリスト</h2>
<ul class="heroines">
	<li *ngFor="let heroine of heroines">
		<a routerLink="/detail/{{heroine.id}}">
			<span class="badge">{{heroine.id}}</span> {{heroine.name}}
		</a>
	</li>
</ul>
05 ナビゲーションを戻る
詳細情報コンポーネント(heroine-detail.component)のテンプレートに、つぎのように「戻る」ボタンを加えましょう。clickイベントにバインディングしたメソッド(goBack())は、このあと定めます。詳細情報には、ダッシュボードとリスト表示のふたつの画面から遷移できました。したがって、そのどちらから来たかに応じてルーティングをさかのぼることになるのです。
src/app/heroine-detail/heroine-detail.component.html<div *ngIf="heroine"> <button (click)="goBack()">戻る</button> </div>
ブラウザの履歴を戻るのは、Location.back()メソッドです。ブラウザとやり取りするサービスクラスLocationのオブジェクトは、コンストラクタがprivateのプロパティ(location)に定めていました。新たに加えるメソッド(goBack())からこれを、つぎのように呼び出せばよいのです。
src/app/heroine-detail/heroine-detail.component.tsexport class HeroineDetailComponent implements OnInit { constructor( private location: Location ) {} goBack(): void { this.location.back(); } }
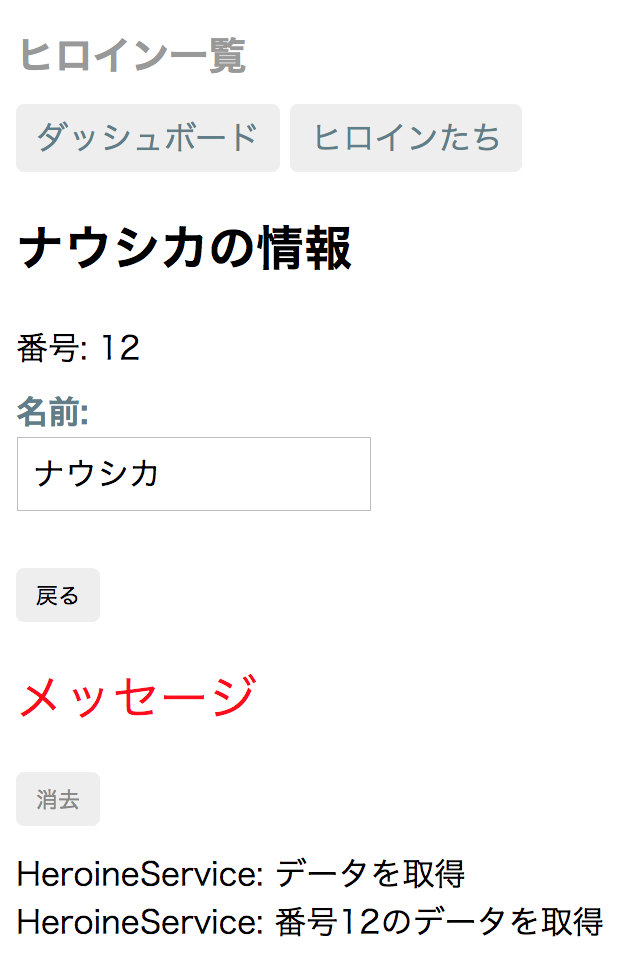
詳細情報のコンポーネント(heroine-detail.component)に「戻る」ボタンが加わりました(図003)。クリックするとブラウザの履歴が確かめられ、ダッシュボードかリスト表示のうち、詳細情報にナビゲートした画面に戻るはずです。コンポーネントのスタイルは、以下のコード003のCSSに改めてください。テンプレートのHTMLコードも、併せて掲げておきます。
図003■詳細情報コンポーネントに戻るボタンが備わった

コード003■詳細情報コンポーネントのCSSとテンプレートの定め
src/app/heroine-detail/heroine-detail.component.css
label {
	display: inline-block;
	width: 3em;
	margin: .5em 0;
	color: #607D8B;
	font-weight: bold;
}
input {
	height: 2em;
	font-size: 1em;
	padding-left: .4em;
}
button {
	margin-top: 20px;
	font-family: Arial;
	background-color: #eee;
	border: none;
	padding: 5px 10px;
	margin-right: 10px;
	border-radius: 4px;
	cursor: pointer; cursor: hand;
}
button:hover {
	background-color: #cfd8dc;
}
button:disabled {
	background-color: #eee;
	color: #ccc;
	cursor: auto;
}
<div *ngIf="heroine">
	<h2>{{heroine.name}}の情報</h2>
	<div><span>番号: </span>{{heroine.id}}</div>
	<div>
		<label>名前:
			<input [(ngModel)]="heroine.name" placeholder="名前"/>
		</label>
	</div>
	<button (click)="goBack()">戻る</button>
</div>
06 要らなくなったコードは除く
今回のアプリケーションの動きは、これででき上がりです。ただ、書き直した結果、要らなくなったコードが少しあります。残しておくのは無駄ですし、後のち予期しない問題を起こすかもしれません。コードが膨れ上がらないうちに除いておきましょう。
リスト表示のコンポーネント(heroines.component)はテンプレートから詳細情報の要素を外しました。そのためつぎのように、詳細情報にデータを与えるための選択項目のプロパティ(selectedHeroine)と、プロパティに値を定めるメソッド(onSelect())は使いません。
src/app/heroines/heroines.component.tsexport class HeroinesComponent implements OnInit { // selectedHeroine: Heroine; /* onSelect(heroine: Heroine): void { this.selectedHeroine = heroine; } */ }
詳細情報のコンポーネント(heroine-detail.component)は、選択されたデータをサービスから得るようにしました。すると、親だったリスト表示のコンポーネントから参照を得るためにプロパティ(heroine)に添えていたデコレータ関数Input()は意味がありません。したがって、importもしなくてよいということです。
src/app/heroine-detail/heroine-detail.component.tsimport {Component, OnInit /* , Input */} from '@angular/core'; export class HeroineDetailComponent implements OnInit { // @Input() heroine: Heroine; }
つぎのコード004が、手直しの済んだリスト表示(heroines.component)と詳細情報(heroine-detail.component)のコンポーネントのTypeScriptコードです。アプリケーションの動きやファイルそれぞれのコードについては、StackBlitz「angular-6-example-tour-of-heroines-07」のサンプルコードをお確かめください。
コード004■リスト表示と詳細情報のコンポーネントのTypeScriptコード
src/app/heroines/heroines.component.ts
import {Component, OnInit} from '@angular/core';
import {Heroine} from '../heroine';
import {HeroineService} from '../heroine.service';
@Component({
	selector: 'app-heroines',
	templateUrl: './heroines.component.html',
	styleUrls: ['./heroines.component.css']
})
export class HeroinesComponent implements OnInit {
	heroines: Heroine[];
	constructor(private heroineService: HeroineService) {}
	ngOnInit() {
		this.getHeroines();
	}
	getHeroines(): void {
		this.heroineService.getHeroines()
		.subscribe(heroines => this.heroines = heroines);
	}
}
import {Component, OnInit} from '@angular/core';
import {ActivatedRoute} from '@angular/router';
import {Location} from '@angular/common';
import {Heroine} from '../heroine';
import {HeroineService} from '../heroine.service';
@Component({
	selector: 'app-heroine-detail',
	templateUrl: './heroine-detail.component.html',
	styleUrls: ['./heroine-detail.component.css']
})
export class HeroineDetailComponent implements OnInit {
	heroine:Heroine;
	constructor(
		private route: ActivatedRoute,
		private heroineService: HeroineService,
		private location: Location
	) {}
	ngOnInit() {
		this.getHeroine();
	}
	getHeroine(): void {
		const id = +this.route.snapshot.paramMap.get('id');
		this.heroineService.getHeroine(id)
		.subscribe(heroine => this.heroine = heroine);
	}
	goBack(): void {
		this.location.back();
	}
}
- Angular 6: Angular CLIで手早くアプリケーションをつくる
- Angular 6入門 01: アプリケーションの枠組みをつくる
- Angular 6入門 02: 編集ページをつくる
- Angular 6入門 03: データのリストを表示する
- Angular 6入門 04: 詳細情報のコンポーネントを分ける
- Angular 6入門 05: データをサービスにより提供する
- Angular 6入門 06: ルーティングで画面を切り替える
- Angular 6入門 08: HTTPサービスでリモートのデータを取り出して書き替える
作成者: 野中文雄
作成日: 2018年5月18日
Copyright © 2001-2018 Fumio Nonaka. All rights reserved.